Measuring instruments for pressure and temperature are used in almost all areas of industrial manufacturing. As a result of continuous mechanical, chemical and thermal loading, these instruments age and can therefore not guarantee the correctness of the measured values over the course of time. Through timely calibration, however, the alteration of the measured value can be determined.
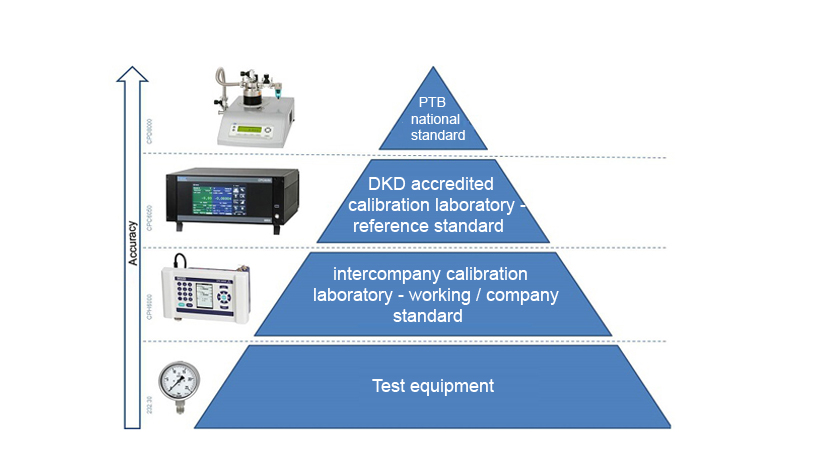
In the process of calibration, the displayed value of the measuring instrument is compared with the measuring result of a different measuring device which is known to function correctly and accurately and which itself has been made to coincide directly or indirectly with a national (or international) reference instrument. In short, to be able to compare measuring results, they must be “traceable” to a national or international standard via a chain of comparative measurements. The calibration hierarchy shown in the picture (using the example of Germany) depicts the traceability of an inspection equipment in a company up to a national standard at the PTB (German national metrology institute).
In order to ensure traceability in practice, the following points must be observed, among others:
- The chain of comparison must not be interrupted.
- The measurement uncertainty must be known in each stage of the calibration chain so that the total measurement uncertainty can be calculated. As a rule, a superordinate measuring instrument should have a measurement accuracy three to four times higher.
- Each step in the calibration chain must be documented, including the measurement results.
- All bodies carrying out a stage in the chain must prove their competence by means of accreditation.
- Calibrations must be repeated at appropriate intervals. The periods depend on the demanded measurement accuracy and the technical requirements
Note
The WIKA calibration laboratory is accredited by the German Accreditation Body (Deutsche Akkreditierungsstelle – DAkkS) in accordance with DIN EN ISO / IEC 17025 for the measurands temperature, pressure, DC current, DC voltage and DC resistance. Further information on our calibration laboratory or an on-site calibration with the WIKA calibration van can be found on the WIKA website. If you are interested in our services, please feel free to contact us via e-mail.
Learn more about the differences between factory calibration and traceable calibration in the following video:

